With the release of the CIS (Center for Internet Security) Windows 11 Benchmark 3.0.1, the corresponding release of the Microsoft Intune build kit, and my colleague Jonathan Fallis covering the CIS community version of the benchmark (and the limitations) on his website, we both thought it would be best to share our combined experience when working with the newly available CIS build kit; focussing on BitLocker security settings in the initial part of this series.
Over the course of three four posts, we’ll be aiming to find and fix any issues the build kit profiles create for Windows 11 cloud native devices, improve functionality using Microsoft Intune where we can, and add any missing configurations between the downloadable benchmark documents and the build kit.
Let’s start with the obvious place.
CIS Build Kits #
If you have access to the CIS Workbench as part of an organisational account, you can download the Windows 11 build kit for Microsoft Intune, which when extracted will give you exported Settings Catalog profiles in JSON format, ready to import into Microsoft Intune:
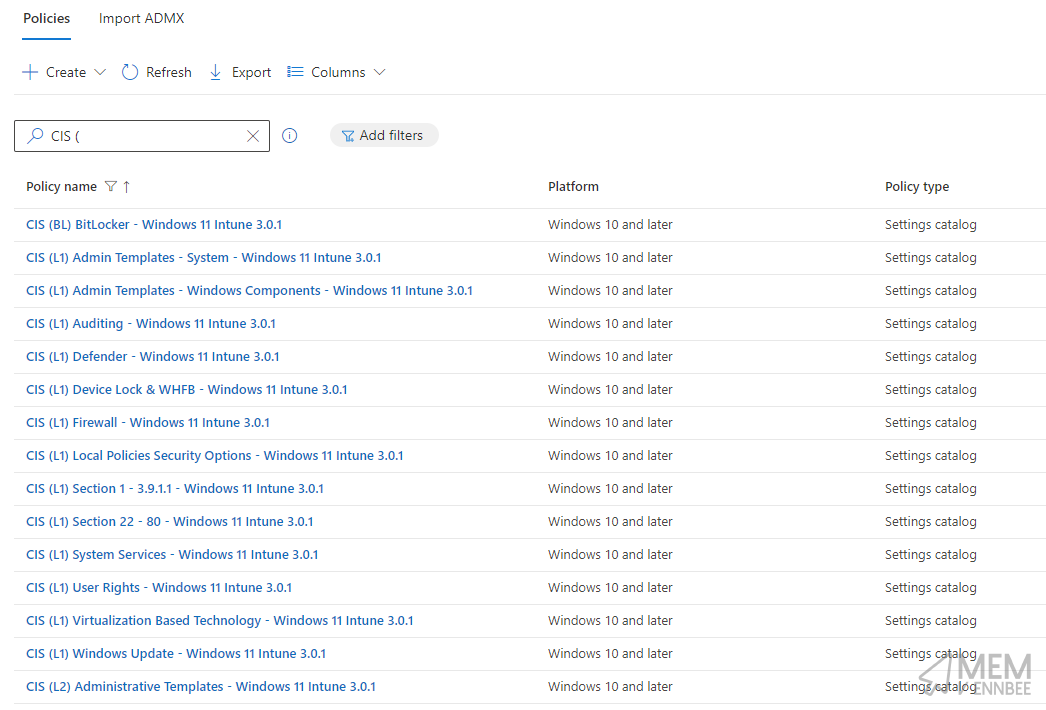
Each of these profiles is aligned with the CIS benchmark whether Level 1, Level 2, or BitLocker settings, and instead of blindly applying these to your device estate, you really should have a look at the following sections on BitLocker profiles, as we build upon our existing understanding of their impact, and fix some issues along the way.
CIS BitLocker Settings #
With only the single BitLocker related policy in the build kit, you’d think encrypting a device with these benchmark settings would be easy.
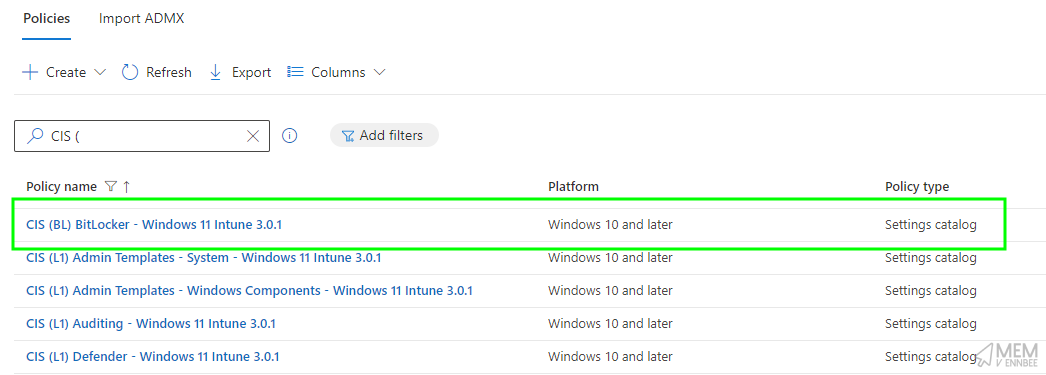
Usually you just configure the use of TPM as the pre-boot authentication, allow Standard Users to encrypt the device, encryption method and cipher strength, encryption method, and boom there you have it, automatically and silently encrypted protected devices.
Well not according to CIS, and for good reason.
Encryption Settings #
Before we look at the rationale behind the recommended CIS settings for BitLocker, one thing that stood out to us when reviewing the provided policy, and the corresponding benchmark document, is a lack of actual encryption settings.
Specifically, the ones that allow for silent encryption to happen…so we need to create a supplemental Settings Catalog policy, to allow for encryption to actually start without pestering a user.
| Category | Setting | Value |
|---|---|---|
| Administrative Templates > BitLocker | Require Device Encryption | Enabled |
| Administrative Templates > BitLocker | Allow Warning For Other Disk Encryption | False |
| Administrative Templates > BitLocker | Allow Standard User Encryption | Enabled |
Along with our preferred encryption ciphers for encryption.
| Category | Setting | Value |
|---|---|---|
| Administrative Templates > Windows Components > BitLocker Drive Encryption | Choose drive encryption method and cipher strength (Windows 10 [Version 1511] and later) | Enabled |
| Administrative Templates > Windows Components > BitLocker Drive Encryption | Select the encryption method for operating system drives: | XTS-AES 256-bit |
| Administrative Templates > Windows Components > BitLocker Drive Encryption | Select the encryption method for fixed data drives: | XTS-AES 256-bit |
| Administrative Templates > Windows Components > BitLocker Drive Encryption | Select the encryption method for removable data drives: | XTS-AES 256-bit |
Finally, our encryption method selecting either Full encryption or Used Space Only encryption.
| Category | Setting | Value | |
|---|---|---|---|
| Administrative Templates > Windows Components > BitLocker Drive Encryption > Operating System Drives | Enforce drive encryption type on operating system drives | Enabled |
|
| Administrative Templates > Windows Components > BitLocker Drive Encryption > Operating System Drives | Select the encryption type: (Device) | Used Space Only encryption |
With the gaps in the CIS benchmark policy now plugged, we can look into some of the other settings and see if our silent encryption settings are going to work.
TPM with PIN Authentication #
Well here’s a problem, the CIS provided BitLocker profile doesn’t allow for TPM only authentication, so out the window goes our ability to silently encrypt the device then.
- Compatible TPM startup - Configure this as Allow TPM or Require TPM
- Compatible TPM startup PIN - Configure this as Do not allow startup PIN with TPM
- Compatible TPM startup key - Configure this as Do not allow startup Key with TPM
- Compatible TPM startup key and PIN - Configure this as Do not allow startup Key and PIN with TPM
Why are CIS requiring both TPM and PIN for BitLocker authentication and stopping us having fun with device encryption?
BitLocker with TPM-only authentication allows for a computer to enter the power-on state without any pre-boot authentication. Therefore, an attacker may be able to perform DMA (Direct Memory Access) attacks.
Ah yeah, a security reason, makes sense. The settings from the profile below show the pre-boot authentication options, requiring startup PIN with TPM, and blocking everything else.
| Category | Setting | Value |
|---|---|---|
| Administrative Templates > Windows Components > BitLocker Drive Encryption > Operating System Drives | Configure TPM startup key and PIN | Do not allow startup key and PIN with TPM |
| Administrative Templates > Windows Components > BitLocker Drive Encryption > Operating System Drives | Configure TPM startup | Do not allow TPM |
| Administrative Templates > Windows Components > BitLocker Drive Encryption > Operating System Drives | Configure TPM startup PIN | Require startup PIN with TPM |
| Administrative Templates > Windows Components > BitLocker Drive Encryption > Operating System Drives | Configure TPM startup key | Do not allow startup key with TPM |
What we could do to alleviate the requirement for a user to configure a PIN to start BitLocker encryption, is slightly amend the policy (and hope that we don’t get audited), changing the below settings to allow the use of TPM and TPM with PIN protectors.
| Category | Setting | Value |
|---|---|---|
| Administrative Templates > Windows Components > BitLocker Drive Encryption > Operating System Drives | Configure TPM startup | Allow TPM |
| Administrative Templates > Windows Components > BitLocker Drive Encryption > Operating System Drives | Configure TPM startup PIN | Allow startup PIN with TPM |
With the settings in Microsoft Intune looking something like this:
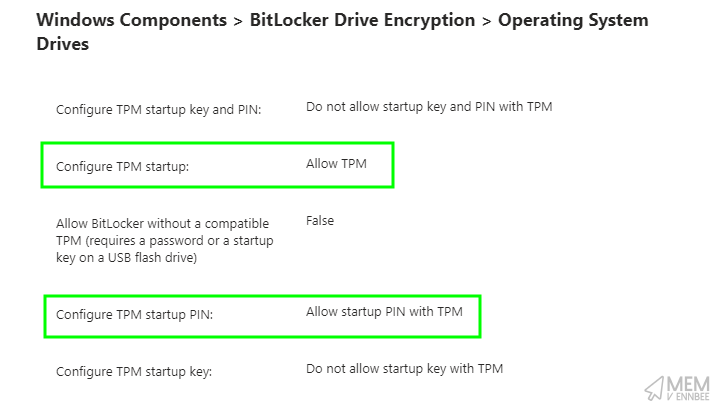
This will enable silent encryption, protecting the data on the device, but also allowing a PIN to be configured afterwards.
BitLocker PIN #
So how about setting this BitLocker PIN then?
Well to remove a user from the equation, we can deploy a PowerShell script to set the BitLocker PIN based on the serial number of the device.
Try {
    $osVolume = Get-BitLockerVolume | Where-Object { $_.VolumeType -eq 'OperatingSystem' }

    # Detects and removes existing TpmPin key protectors as there can only be one
    if ($osVolume.KeyProtector.KeyProtectorType -contains 'TpmPin') {
        $osVolume.KeyProtector | Where-Object { $_.KeyProtectorType -eq 'TpmPin' } | ForEach-Object {
            Remove-BitLockerKeyProtector -MountPoint $osVolume.MountPoint -KeyProtectorId $_.KeyProtectorId
        }
    }

    # Sets a recovery password key protector if one doesn't exist, needed for TpmPin key protector
    if ($osVolume.KeyProtector.KeyProtectorType -notcontains 'RecoveryPassword') {
        Enable-BitLocker -MountPoint $osVolume.MountPoint -RecoveryPasswordProtector
    }

    # Configures the PIN and Enables BitLocker using the TpmPin key protector
    $deviceSerial = (((Get-WmiObject -Class win32_bios).Serialnumber).ToUpper() -replace '[^a-zA-Z0-9]', '')
    If ($deviceSerial.length -gt 14) {
        $deviceSerial = $deviceSerial.Substring(0, 14) # Reduce to 14 characters if longer
    }

    $devicePIN = ConvertTo-SecureString $deviceSerial -AsPlainText -Force
    Enable-BitLocker -MountPoint $osVolume.MountPoint -Pin $devicePIN -TpmAndPinProtector -ErrorAction SilentlyContinue | Out-Null

    # Gets the recovery key and escrows to Entra
    (Get-BitLockerVolume).KeyProtector | Where-Object { $_.KeyProtectorType -eq 'RecoveryPassword' } | ForEach-Object {
        BackupToAAD-BitLockerKeyProtector -MountPoint $osVolume.MountPoint -KeyProtectorId $_.KeyProtectorId
    }
    Exit 0
}
Catch {
    $ErrorMessage = $_.Exception.Message
    Write-Warning $ErrorMessage
    Exit 1
}
The script, in short will carry out the following:
- Removes any existing TpmPin key protectors, as there can only be one #highlander.
- If a Recovery Key key protector doesn’t exist, it will create one.
- Get the serial number of the device, converting it to uppercase, and shortening it to the first 14-characters if it’s longer than that.
- Creates a new TpmPin key protector with the PIN set to the converted serial number.
- Backups the recovery key to Entra.
It can then be deployed to your Windows Autopilot devices using a Platform Script in Microsoft Intune in conjunction with the supplemental policy we created, with the below settings:
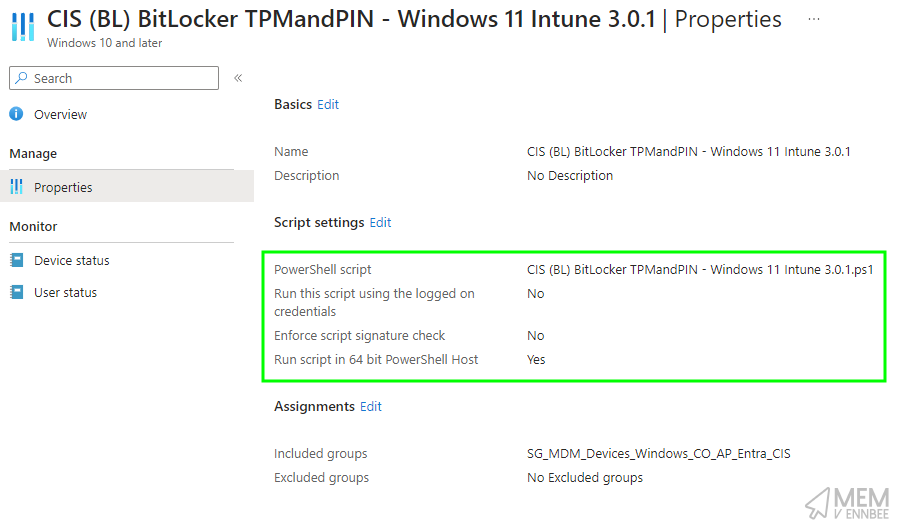
Using a Platform script over a remediation script allows this to be run (maybe) during Windows Autopilot, or if you’re fancy and using the new Windows Autopilot device preparation method, actually guarantee that it runs during the deployment.
For our test Windows Autopilot device with the inventive serial number qwertyuiopasdfghjklzxcvbnm, set using Advanced Settings Editor for Hyper-V Virtual Machines and by running a hand across a keyboard…
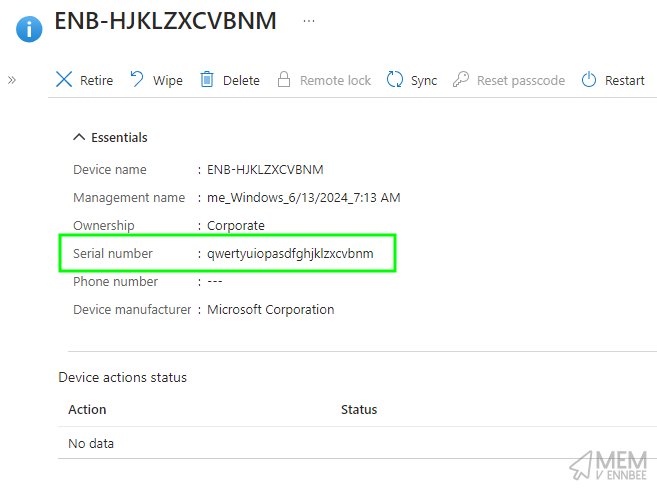
We can see that after restarting during Windows Autopilot (forced by another CIS setting, but more on that another time), the device is now asking for a BitLocker PIN, and low and behold it’s the first 14-characters of the device serial number in uppercase:
After deploying the PowerShell script, remember to tell your end users what their BitLocker PIN is, and get them to change it themselves within Windows after the Windows Autopilot deployment has completed.
Thunderbolt DMA Protection #
We’ve looked at DMA (Direct Memory Access) settings previously, but looking at exceptions to security hardening not the implementation of them, but we’re familiar with what they are at least.
The settings in the CIS profile basically reduce two threat types to BitLocker; what it actually does from an end user experience perspective, is stop peripherals connected to a dock using a Thunderbolt port connection to a Windows device from being used prior to logon.
| Category | Setting | Value |
|---|---|---|
| Administrative Templates > System > Device Installation > Device Installation Restrictions | Prevent installation of devices that match any of these device IDs | Enabled |
| Administrative Templates > System > Device Installation > Device Installation Restrictions | Also apply to matching devices that are already installed. | True |
| Administrative Templates > System > Device Installation > Device Installation Restrictions | Prevented device IDs | PCI\CC_0C0A |
| Administrative Templates > System > Device Installation > Device Installation Restrictions | Prevent installation of devices using drivers that match these device setup classes | Enabled |
| Administrative Templates > System > Device Installation > Device Installation Restrictions | Also apply to matching devices that are already installed. | True |
| Administrative Templates > System > Device Installation > Device Installation Restrictions | Prevented Classes | {d48179be-ec20-11d1-b6b8-00c04fa372a7}, {7ebefbc0-3200-11d2-b4c2-00a0C9697d07}, {c06ff265-ae09-48f0-812c-16753d7cba83}, {6bdd1fc1-810f-11d0-bec7-08002be2092f} |
To further secure BitLocker and protect from attacks, additional controls exist in the same CIS policy to disable standby power states:
| Category | Setting | Value |
|---|---|---|
| Administrative Templates > System > Power Management > Sleep Setting | Allow standby states (S1-S3) when sleeping (on battery) | Disabled |
| Administrative Templates > System > Power Management > Sleep Setting | Allow standby states (S1-S3) when sleeping (plugged in) | Disabled |
Leaving us only with one potential exposure of the three in the linked article:
- Systems that are left turned on.
- Systems that are left in the Standby power state.
- Systems that use the TPM-only BitLocker protector.
We can’t do much about devices that are left turned on sadly, short of powering down systems programmatically, which isn’t going to please anyone, so these DMA settings are going to have to stay exactly as they are.
Miscellaneous Settings #
So this won’t be the first example of where it’s important to review the benchmark documentation and not just use the build kit, as there are additional BitLocker settings under section 86.1.4 (BL) Ensure ‘Enumeration policy for external devices incompatible with Kernel DMA Protection’ is set to ‘Enabled: Block All’ surrounding device enumeration policies and more DMA protection:
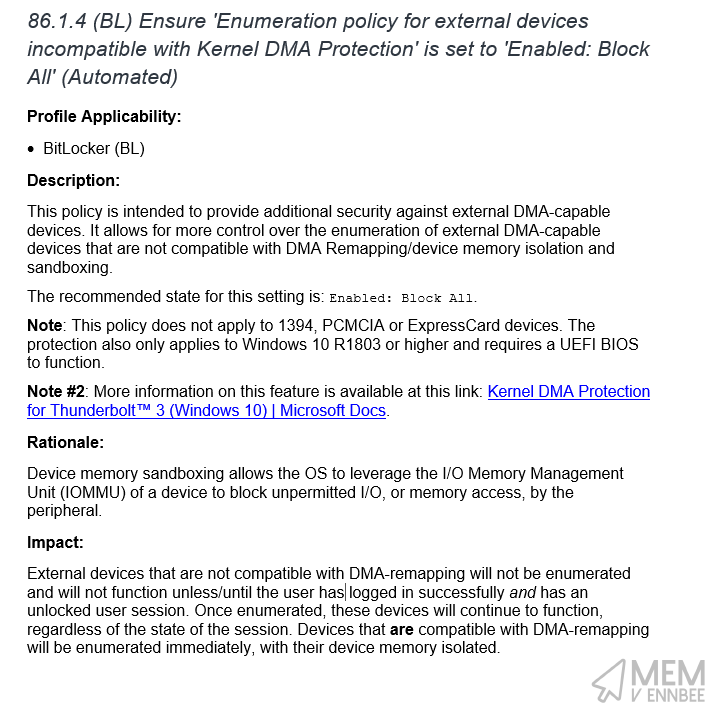
To meet these additional requirements, we did need to configure a new Custom Profile, in Microsoft Intune to align to the DeviceEnumerationPolicy recommendation in the benchmark, but now we can just use a Settings Catalog profile instead.
| Category | Setting | Value |
|---|---|---|
| Dma Guard | Device Enumeration Policy | Block all (Most restrictive) |
Which was created based on the details in the Policy CSP article. This is another device impact setting, adding to the Thunderbolt DMA protection settings, and stopping DMA capable devices that cannot be sandboxed, remapped, or isolated in memory.
Be cautious though, as this policy setting does require a restart, but doesn’t force one.
Summary #
So that’s all there is to the CIS benchmark for Windows 11 BitLocker security in Microsoft Intune, pretty simple really 😅.
We hope you now have a good grasp on exactly what the benchmark and policy settings are doing regarding BitLocker and the security around it, why the policies are applying these settings, and importantly how to improve and work with the restrictions to make not only the implementation in Microsoft Intune more straight forward, but also the end-user experience.
This saves you just implementing the benchmark build kit settings in Microsoft Intune and being all
 when your devices don’t just encrypt themselves, or your keyboards connected to docks don’t work at the sign-in screen.
Next up for us in the series are the CIS Level 1 settings, and if you thought the BitLocker settings were painful, you’re in for a shock 😆.


